Saturday, November 22, 2014

Wednesday, November 19, 2014

Change filesystem label in Ubuntu 14.04

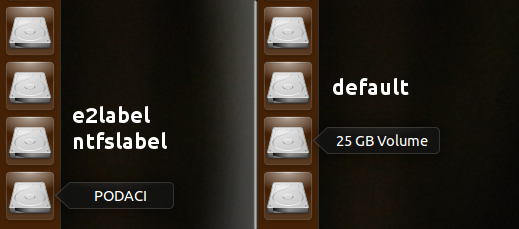
You probably noticed that drives in Ubuntu, by default, have their names by its size, not by operating system on it or by description of content. That's annoying me.

To change that, You need two packages: e2fsprogs and ntfs-3g.

First package contains e2label tool, for changing ext2, ext3 or ext4 filesystem label. And second contains ntfslabel tool for changing ntfs (Windows) filesystem label.

I think both e2fsprogs and ntfs-3g are installed by default in Ubuntu 14.04.

To change Your Linux or Windows filesystem label, do:

sudo e2label LINUX-DEVICE NEW-LABEL
or
sudo ntfslabel WIN-DEVICE NEW-LABEL

Replace LINUX-DEVICE and WIN-DEVICE with appropriate ones (i.e. /dev/sda2 or /dev/sda5). Replace NEW-LABELs with desired names, too.


See picture above for diffs.

For more options, see man pages of the tools.

Monday, November 17, 2014

Create aliases in Ubuntu 14.04

How often You must run some long commands in terminal? Even if You do not use "complicated" commands, You probably typed, at least once, the commands for updating Your system.

You know, like this:

sudo apt-get update && sudo apt-get upgrade

This and similar (long) commands can be very iritated, no matter if You use it often. Because of that, You can create aliases for frequently used commands. Alias is shorter command. In example, You can type update to update Your system instead of the above (long) command.

To do this, You need to enter alias for a command in appropriate file. That file is $HOME/.bashrc. It's hidden file, located in Your /home directory. To see it, press ctrl+h key combo. Open the file and scroll down to the bottom. Now, enter aliases for desired commands, like this:

alias update="sudo apt-get update && sudo apt-get upgrade"

See how it looks in my .bashrc file:


I created section My aliases and put there aliases for frequently used commands. You can call it whatever You want.

After You finish this, Save the file. Now, You need to do one more step. Open terminal and type:

source ~/.bashrc

After that, when You want to update Your system, all You need to type in terminal is update.

Saturday, November 15, 2014

Weekly reminder ::: Week 5


I want to thank you all for reading and visiting my blog.
I love you and see you next week.
Stay free...

Wednesday, November 12, 2014

HOW-TO: Automount partition(s) in Ubuntu

In this article I'll show You how to automatically mount a partition on system start up. In Ubuntu this is not something You must to do if You want to access Your "other system" or "data" partition because Ubuntu has simplified system for that purpose. In other Linux systems, like i.e. Slackware or Arch, this is very usefull because there You need to enter Your root password to access other partitions. But, there is no impediments to do this in Ubuntu, too.

The file we interested in is /etc/fstab.


Step 1


Get UUID of desired partition You want to automount. Simply call blkid as root in terminal: 

sudo blkid

This will list all Your partitions with their UUIDs.


Step 2


Create folder in which You will mount desired partition. I prefere /media/FOLDER location for mounting other partitions. Replace FOLDER with desired name.

sudo mkdir /media/FOLDER

Step 3


Open /etc/fstab in Your favourite text editor and see the picture before Step 1, in this article.
First, enter description for the partition. Do it in comment mode. Put # in front of descrition, so the line will be interpretedlike a comment, not code.
You may notice on the picture, the third line from bottom, some columns:

<file system>  <mount point>   <type>    <options>     <dump>      <pass>

This will help You to correctly enter all necessary informations in the file. Separate columns with TAB key.

<file system>

Partition or storage device to be mounted. Here You can add partition like i.e. /dev/sda2 or You can add UUID like on the picture.

<mount point>

Directory (mountpoint) where <file system> is mounted to. In our example - /media/FOLDER

<type>

The <file system> type, like ext3, ext4, ntfs, btrfs and so on.

<options>

Mount options of the filesystem to be used. See all mount options. Don't be afraid, in almost all cases it'll be defaults.

<dump>

Used by the dump utility to decide when to make a backup. If "0", dump will ignore the file system. If "1", dump will make a backup.

<pass>

Used by fsck to decide which order filesystems are to be chacked. Possible values are 0,1 and 2. Root filesystem should have the highest priority - 1. Other filesystems should have lower priority - 2. If "0", filesystem will not be checked by fsck.


Well, the line should have look like this:

UUID=your_uuid             /media/FOLDER             ext4             defaults            0             1

Save the file.

Step 4

Open terminal and mount all entered partitions.

sudo mount -a

Then, check if everything went good.

cd /media/FOLDER
dir

If You see appropriateitems, everything is OK.

From now on, everytime You start Your system, the partition(s) will be automatically mounted.

Monday, November 10, 2014

Remove items from sound indicator in Unity panel (troubleshooting) ::: Ubuntu 14.04

As You know, when some audio/video app is open, relevant item appears in sound indicator in Unity panel. Item(s) stays there forever. For me, it can be annoying. There is a way to remove it from sound indicator, but sometimes it is impossible to do it successfully. Why, I don't know.


Here I'm going to show You how to remove items from sound indicator in Unity panel. Regular way is to use dconf-editor. Simply, open the app and navigate to
com/canonical/indicator/sound.


When You start i.e. Rhythmbox music player, it appears in interested-media-players line. You need to reset this to default value, so sound indicator will be cleaned after system reboot. Further, if You want to prevent Rhythmbox from showing in sound indicator, simply put 'rhythmbox' value in blacklisted-media-players line above (first line).

What to do if this does not work? 


From some reason, this does not work for me. So I need to manually reset intersted-media-players parameter every time when logged in Ubuntu. I found another way to do this. I wrote a script for this task and put it in Startup Applications, so it runs automatically every time I logged in Ubuntu.

#! /bin/sh
#
# Reset interested-media-players parameter in
# dconf-editor

set -e

gsettings reset com.canonical.indicator.sound \
interested-media-players

exit 0

I called it reset_interested_media_players.sh. You can call it whatever You want. You need to make it executable.

sudo chmod +x SCRIPT

And You need to put it in Startup Applications, so it runs every time You log in Your system.


In Command space, enter the following:

sh -e /script/location/SCRIPT.sh

Change script location and SCRIPT.sh with appropriate values. That's it... It's not a big thing, but it does the job.

Saturday, November 8, 2014

Friday, November 7, 2014

Change mouse click behavior and add DELETE action in Nautilus context menu

Big majority of computer users used to open files and folders by double click on mouse. But, there is option to change mouse behavior, so You can open files and folders by single mouse click. There are many pros and cons about this behavior, all depends of a user and his/her habits, ways of computer using.

In example, it's good for faster opening files and folders, but it's not good for previewing files in Nautilus, because You must click on a file (select it), so You can preview it. This can slow all the operation, because You can not click on a file (this will open the file), but You need to select it.
I am going to show You how to change this behavior and You decide whether You'll change it or not.

Open Nautilus and head for Edit->Preferences and choose Behavior tab. In the first section, Behavior, You can change mouse click behavior, by choosing Single click to open items.


I was long-time KDE user and I loved very much this feature in KDE. But, Unity differs from KDE and here the option isn't that usefull like in KDE.

As You can see, in the same tab is other options. There is also option for adding DELETE action in Nautilus context menu. Look for it in Trash section, at the end of the tab. Just mark the box before Include a Delete command that bypasses Trash.

This is very usefull (for me), because I don't like moving files to Trash and then click to Empty Trash. Boring to me... By including the command in Nautilus context menu, You will be able to bypass Trash. My advide to You is not to uncheck previous option, Ask before emptying the Trash or deleting files. It's a good safety measure.

Thursday, November 6, 2014

Show real name in Unity panel

I can not remember whether there was real name shown in Unity panel by default, in earlier versions of Ubuntu's Unity. Nevermind, in this article I am going to show You how to do it. I prefer not to show my name in Unity panel, but who cares about me...

OK, there are more then one way to do this, but I'll do it in two different ways.

dconf-editor

Open dconf-editor and navigate to apps/indicator-session and check the box behind show-real-name-on-panel.


Unity Tweak Tool

Launch Unity Tweak Tool and search for Panel section. There You can check the box before Show my name.


Now You can see Your (real) name in the far right on panel.


Wednesday, November 5, 2014

How to change scrollbar mode in Ubuntu 14.04 (Unity)

If You are new, fresh Ubuntu user, You probably noticed that scollbars are in overlay mode. You must place cursor over tiny field on the right side of window, so scrollbar appears. If You don't like overlay mode, You can change it to normal (legacy) mode just in a few clicks.

dconf-editor

Navigate to com/canonical/desktop/interface


You can choose normal, overlay auto, overlay pointer and overlay touch mode.


Unity-Tweak-Tool

Open Unity Tweak Tool and go to Scrolling section.


Here You can change overlay mode to legacy (normal).


Monday, November 3, 2014

How to disable Suspending and Screen Locking in Ubuntu 14.04

How many times Your screen was locked or suspended while You were watching Youtube videos or movies, listening music... Is that annoying You? Me, too.

Well, it is good feature (enabled by default in Ubuntu 14.04) when You are using laptop, but on desktop computers it can be very irritating. Most of all, because on desktop computers there is no need for power or battery saving. Same situation is in case of laptop plugged in AC/DC power.

Here I'm going to show You how to disable these features, and You'll can enable them later, if You'll need them.

Everything You need to do is to open System Settings and navigate, first to Brightness & Lock. Change settings like ones on the picture:


Then, go back to Power section and do the same:


And that's it. You can now peacefully watch videos or listen music. Enjoy...

Saturday, November 1, 2014

Weekly reminder ::: Week 3

Almost a month has gone and the blog is growing slowly. 
In this week, we had some tips and tricks related to Ubuntu 14.04 and Unity DE.


I want to thank you all for visiting and reading my blog.
I love you and see you next week.

Stay free...

Friday, October 31, 2014

Open in terminal (Nautilus) ::: Ubuntu 14.04

After a long time being KDE user, I came to Unity. There was, still are, some Dolphin functionalities and I want them in Unity, too. Sincerely, Dolphin is much more customizable and feature-rich than Nautilus, but some of the functions You can add/install in Nautilus.

One of them is Open in Terminal.

You need to install this action:

sudo apt-get install nautilus-open-terminal

Now, log out and log in.


When You right click in Files, You'll see Open In Terminal action in context menu. This action allows You open terminal always in specific folder, current working directory, so You do not have to type whole whole address (location) of a folder where You need to do something. Just open the folder in terminal.

Thursday, October 30, 2014

File preview in Nautilus ::: Ubuntu 14.04

As You know, there isn't way to preview files in Nautilus, by default. This feature is especially useful in case of pictures, but it can be used in many other situations, too. Simplest nautilus add-on, gnome-sushi, is an answer.

The add-on allows You to quickly preview musics, pictures, movies and documents. Only thing You need to do is to press SPACE key after You slecet desired file to preview.

You can install it via Ubuntu Software Center or via terminal:

sudo apt-get install gnome-sushi

Enjoy...


Tuesday, October 28, 2014

How to add restart action in indicator-session menu in Unity

You've probably noticed that there is no restart action in indicator-session menu in Unity, by default. There are  shutdown and logout actions. Button for runing the indicator is placed in top right corner of Your screen, or far right on Unity panel.

By default, when You run shutdown action from the menu, it'll ask You to restart or shutdown Your system. To prevent this, You can add restart action in the menu. After that, when You click on an action, appropriate function will run immediately, without the question.


This can be achieved through GUI or CLI. The first method requires dconf-editor installed. After installation, run the app and navigate to:

apps->indicator-session->suppress-logout-restart-shutdown

and check the box.


Or, You can type this in terminal:

gsettings set com.canonical.indicator.session suppress-logout-restart-shutdown "true"

Monday, October 27, 2014

Create and safely store and keep your passwords in Ubuntu

How often You were listening about how it is important to create strong passwords for Your accounts? Password's strength and way of keeping are essential questions today. In this article I'll present to You my way of creating and keeping passwords.

There are many different ways, so feel free to explore.


Create

The tool I'm using to create my passwords is makepasswd. You can install it via Ubuntu Software Center or via terminal:

sudo apt-get install makepasswd

Then, generate random password (i.e. 20 characters):

makepasswd --chars=20

For full list of options, use:

makepasswd --help

Its very important to create random password, with no meaning. If You decide to manualy create Your password, please avoid personal names, phone numbers etc... Use combination of uppercase and lovercase letters, special characters etc...

Store

There are many apps which allow You to store Your passwords. I love KeePassX.

sudo apt-get install keepassx

When You start the app, it'll ask You to create master password for entering. Please, create strong password and keep it on a peace of paper and do not show it to anybody.


I'm using master password in Firefox and Thunderbird, too.
Now You can enter Your accounts and related informations in KeePassX.

Keep

When You finished, You'll need to save it to a file. Make sure to change permissions of the file, so only You can read or write it. You can do this by

right click on the file->Properties->Permissions

and set permissions like this:


Anyway, I prefere to keep the file on USB stick key, not in my computer. Well, its up to You.

Saturday, October 25, 2014

Weekly reminder ::: Week 2

Second week is behind me, behind us.


Beginers and new Ubuntu users could learn about:


And, of course, You could read about my thoughts related to new Ubuntu, Utopic Unicorn.

Those who are advanced users could remind themselfs about how it was when they were entering in whole new world, world of free software.

I want to thank you all for visiting and reading my blog.
I love you and see you next week.

Stay free...


Friday, October 24, 2014

My thoughts about Ubuntu 14.10

The day has come, Ubuntu Utopic Unicorn is here. Last week or two various blogs wrote about this, in that moment - upcoming, version of Ubuntu. We could read many aspects of view about name, specs, look etc. Some of them were correct, and some were beyond measure as we can see now.

First of all - name. Utopic Unicorn? Come on! That animal even don't exist. Was Canonical try to tell us something through the name? Maybe. Think about that...

Second - good thing about Unicorn was that developers warned us to not expect much from new version of Ubuntu. It's interim version, as all .10 versions are. But then, some official Ubuntu blogs wrote about how to upgrade Trusty Tahr to Utopic Unicorn. To be worse, they claimed how it is safe to do upgrade through System Updater, from running system. Of course, many users did this and now they asking how to downgrade their systems.
Please, do not upgrade to Utopic Unicorn now.


If You are using Your machine for work, stick to the LTS versions. But, if You want to upgrade anyway, do it in another way.
  • Download Utopic ISO 
  • burn it to DVD or put it on USB 
  • create backup of Your Home directory (You must not do that if You have Your Home directory separated from root)
  • Do clean install 
  • restore backup of Your Home directory
Okey, You can backup some other folders from root directory, too. Create backup for everything You think is important to You, Your settings i.e.

Great things about new Ubuntu release are the new versions of some programs, new kernel... But, my advice to You is wait a bit before You do upgrade to 14.10. Let some things come to their place, and if You must, only if You must, do upgrade.

I didn't try Xubuntu, but I saw screenshots. If that purple colour is now the default colour for highlighted background - it is disaster. If not - take my apology.

And here we come to one of bright points in "Utopic" family - Ubuntu MATE. It's first Ubuntu version with MATE DE, unofficial version. There are rumors that MATE will become official Ubuntu DE in near future. Great look, good old Gnome2. Yeah, we'll see...

Thursday, October 23, 2014

Change automatic update mode to manual in Ubuntu 14.04

When we talked about first steps in Ubuntu, I told You that Ubuntu is doing everything for You in case of software update. And that's a true. But, if You don't like that, like I don't, You can change update mode and set it to manual.
In this article I'll show You how to do that.

Open Ubuntu Software Center, go to Edit -> Software Sources... and then to Updates tab. Where it says Automatically check for updates, choose Never.


By this way, you'll prevent Software Updater from automatically launching and checking for available updates. Instead, this job depends on You. By the way, notification will be displayed immediatelly when security updates are available.

From now, You and only You will update Your system. You can do this through Software Updater or Terminal, it's Your choice.

Software Updater

Just press meta key (usually Windows logo key) and type update. Open Software Updater and wait to check for available updates. If there are any, click Install button and wait to finish installation.

Terminal

Open terminal and:

sudo apt-get update && sudo apt-get upgrade

If there are any available updates, confirm the process (type Y when prompted), and wait to finish installation.

After update process, restarting computer is probably the best and the safest step.

Wednesday, October 22, 2014

How to install and change fonts in Ubuntu

Even if Ubuntu brings a bunch of fonts, those users, who work in any program for video/photo/text editing, always need extra fonts. Or you may be ordinary user who wants to make your workspace more beautiful or extraodrinary.

New, extra fonts you can download from many different sites, and here are some of them:

Download desired font(s) and extract downloaded archive. Now you need to move extracted folder to /usr/share/fonts as root. This can be accomplished through GUI or CLI. If you decide to do it through GUI, read my article about installing and changing new themes in Ubuntu.

CLI way

Open terminal and:

cd /to/folder/where/downloaded/font/archive/is

sudo mv FONT_FOLDER /usr/share/fonts/

I prefere to put .ttf  fonts in /usr/share/fonts/TTF folder and .otf  fonts in /usr/share/fonts/OTF folder, but it's not a rule. It is important, only, to put desired font files in /usr/share/fonts folder.

After that, no matter whether you did it through GUI or CLI, you'll need to refresh your new font cache if you want to use new fonts, and you'll want it. Well:

sudo fc-cache -f -v

New fonts are now available and you can use them in your work. To change default fonts in your system, open Unity Tweak Tool, search for Fonts section and set your favourite fonts.

How to install new icon themes in Ubuntu

Yesterday I wrote about how to install new themes in Ubuntu Unity. Today, I decided to show you how to install new icon themes.

Process of installation is almost same. One thing is different and that is folder where you put downloaded and extracted icon theme folder. Let's take a look...

You decided to change default icon theme. First, visit one of the two sites mentioned in previous article, download desired icon theme, extract downloaded archive and move extracted folder to /usr/share/icons. You must be root user to accomplish this task.

You can do it in GUI or CLI way.

After that, open one of the tools for tweaking Unity, find icons section and select newly installed theme.

Done.

Tuesday, October 21, 2014

How to install and change themes in Ubuntu

Ubuntu comes with small number of themes and icon themes. Default Ubuntu theme is very beautiful for me, but I want to change it from time to time. Actually, every user want to do this.
There isn't automated way for installation. In example, in KDE user can download and install desired theme in one click. In Unity, you must download desired theme manually, place it in right directory (manually again) and then you can set it as your theme. Well, let's take a tour...

Sites from which you can download themes are:
Actually, these are the most popular sites with large number of themes, and other stuffs.

Choose desired theme(s), download it and extract it in the same directory. Now you have two options. You may set the theme only for one user (you) or for all users (system wide).

One user

You need to move extracted folder to ~/.themes folder. That folder is hidden and it located in your Home directory (~). To see hidden folders and files, press ctrl+H. Now, simply move or copy extracetd theme folder to the hidden one.

System wide

In this case, you'll need to move theme folder to /usr/share/themes. That folder is located, not in your Home, but in root directory (/). To do whatever in /, you must have administrative privileges, you must be root user. This can be done in two ways, GUI and CLI.

GUI way means that you need to open Nautilus as root and then move or copy theme folder to /usr/share/themes. Let's do this:

Press alt+F2 and type: gksu nautilus; press ENTER; enter your root password when prompted and simply move or copy theme folder to /usr/share/themes.

CLI way means that you'll need to do this from terminal. Open terminal and:

cd /location/of/downloaded/theme/folder
sudo mv THEME_FOLDER /usr/share/themes/ 

Replace THEME_FOLDER with appropriate folder name.

Now you can use one of the tools we mentioned in article about Unity tweaking. Find themes section and installed theme(s) will be in a list of available themes. Just select it and that's all.

Monday, October 20, 2014

Applications for tweaking Unity

Unity Desktop Environment is main environment in Ubuntu since version 10.10 of Ubuntu Linux. When Canonical decided to replace GNOME2 with Unity, that led to big disagreement between users and developers. Users loved good old GNOME2, but developers had vision and Unity was the main part of that vision. Still is.
That reminds me to similar situation about KDE, when there was a big change - transition to KDE4. Many users left KDE and crossover to other DEs. But, hey, KDE is the most used DE today.

Anyway, one of the biggest complaint were very limited possibilities of editing and changing workspace in new Unity. Today is another story about that. You have various apps for personalizing Unity. The most used and the best, for me, is Unity Tweak Tool.
I don't remember if the app comes preinstalled or I added it later. Anyway, you can check in Ubuntu Software Center if the app is installed. If not, install it in one of ways we discussed in post about ways to install software.


As you can see, there are four menus and many submenus. Enter every submenu, see what it gets and tweak your Unity.

There is System Settings in Unity, too. But in there, you can change various aspects about System, Network, Printer, Security, User Accounts and so on. In System Settings, there is just one item, Appearance, where you can change wallpaper, icon size in Launcher, theme and some basic settings about launcher and workspace, just few.

Unity Tweak Tool offers you a wide range of options.


There are other similar apps for that purpose like gnome-tweak-tool, Ubuntu tweak, dconf-editor... And they have almost the same options like unity-tweak-tool, except dconf-editor. It has some additional options. You can try them, too.


Saturday, October 18, 2014

4 ways to install additional software in Ubuntu

OK, you "walked" through your fresh installed Ubuntu, saw what it gets, and you want to install new programs. Every user has faourite apps and Ubuntu gives to user opportunity to install what he wants. As I said before, there are nearly 50.000 packages in Ubuntu repositories waiting for you to install it. In that case, you have 4 common ways to install additional software.

Ubuntu Software Center

The most common and easiest way is installation through Ubuntu Software Center.


Search for your favourite program, see More Info about it if you want, read comments from other users, raitings and so on. Click Intall and that's it. Done.

Synaptic Package Manager

Synaptic doesn't come preinstalled and you have to install it manually. Yes, do it through Ubuntu Software Center or wait to see other ways to install additional software.


Synaptic Package Manager is old-school program but very popular even today. You may see screenshot(s) of the program, read ChangeLog. Just check the box before desired program, mark it for installation and click Apply button to start program installation.

apt-get 

Both previous ways allow you to install programs through GUI (Graphical User Interface). But, Linux offers you another way, CLI (Command Line Interface) way for same purpose. It's like CommandPrompt in Windows.

Open Terminal and type:
sudo apt-get install <PROGRAM_NAME>

Replace <PROGRAM_NAME> with desired program. SUDO in front of the command means that you run the command with administrative privileges. That means that you cannot run this command as normal user, only as root.

Full list of posible commands you can get by typing:
apt --help
or
apt-get --help


There will be listed all dependencies and extra packages which will be installed. Also, there will be listed recomended packages you can install, if you want. Just say Y (yes) when prompted and installation begins.

PPA repositories

PPA stands for Personal Package Archive. This is software which is not incorporated in official Ubuntu repositories, but there is big chance to being incorporated. The software is managed and packed by users, not Canonical.

Anyway, it's easier way to install software which is not incorporated in Ubuntu repos then compiling it from source.

In exemple, if you want to install awoken icon theme, you'll find something like this:
https://launchpad.net/~alecive/+archive/ubuntu/antigone

You need to add that repo in your source list adn then you can install awoken icon theme. How to do it? Simple...

sudo add-apt-repository <PPA>

Replace <PPA> with appropriate one. Follow the instructions (there are only two steps). After that update your source list and then install the software:

sudo apt-get update && sudo apt-get install <SOFTWARE>


Friday, October 17, 2014

Very first steps in Ubuntu

Hey you, did you install your Ubuntu?

No? Please, read why you should choose Ubuntu. If YES, let's take the first steps in fresh installed free OS.

First of all, you need to update your system. After first update, whenever you take it, you'll have complitely fresh apps. First time, you'll get notification about available updates. Click on it and it takes you step by step through the process. Anyway, app for that purpose is Software Updater. Launch it anytime, and it'll check if there are available updates for your system.


Actualy, the program is set to check for updates every day. So, don't worry, Ubuntu does important jobs for you. You can change this and other options, but some other time about that.

After this step, you'll probably want to install proprietary graphics drivers. Am I right? Launch Additional Drivers program and choose relevant or desired driver for your graphic card.


Now you can play your favourite video games via Steam. Done.

Yes, that's it. Think about wireless driver - check it. It works. Sound? Works, too. Want to watch videos on Youtube? Go a head. It works out of the box. Flash plugin is there. I don't remember if I told you, but Ubuntu is fully equipped operating system. Everything, or almost everything works out of the box.

Thursday, October 16, 2014

Ubuntu - Fully equipped OS

None of my friends using Linux. What to tell you, I'm just persuaded my wife to take a tour (I hope for good) on Ubuntu Linux. Some weeks ago, I talked with one guy. Very often system crashes, system installations, searching for apps... are killing him.

Hey, well there is solution! Try Ubuntu!

Ubuntu is fully eqipped, completely functional and stable free operating system, that works just after installation. Ubuntu brings you all of software that you need for every-day use. Also, there are near 50.000 packages in software center. You need something? - take a look out there.


If you like rock stability, LTS (Long Term Support) versions are your goal. You'll have support for five years. If you prefere always new software - head for regular versions that have support for nine months. Canonical announcing LTS versions in a period of 2 years, and regular versions in a period of six months.

For internet use, you have Firefox browser, Thunderbird mail client, Transmission bittorrent client, Empathy internet messaging, Desktop sharing, remote desktop client etc.
Multimedia pack has Rhythmbox music player, Videos video player, Brasero disk burning tool, Cheese (similar to Skype, but free and open sourced).
When we talk about office suite, there is LibreOffice suite that brings you Writer, Calc, Impress, Draw, Math. Well, full suite for office work.
There are some small games like Mines, Sudoku, Solitaire, Mahjongg. Then, whole bunch of programs for customization, System Settings, Software Center, Additional Drivers and so on.

Actually, you don't need to run for drivers over internet. Linux kernel have support for very high percentage of all hardware ever made. Well, just install Ubuntu, restart computer and run your OS.

Wednesday, October 15, 2014

Bored with restrictions? - Choose Ubuntu

I'm consume "freedom" for about 3-4 years. This period represents my new life. In "previous life"I was a thief. Thief, who used everything that other thieves stole from other "thieves inventors". I didn't know neither how that stuffs works nor what I get. But I used that anyway.

Thief inventor is a person who give to you something "valuable", but put chains on you. Yes, chains. Have you ever feel like you "can" do everything, but always something restrains you, even stops you in your work? And you don't know why. You even have no chance to know, to discover why. 

What thief inventor stoles from you? Freedom... All kinds of freedom. Freedom to choose, freedom to use (as you like), freedom to tell somebody, to give somebody, to work with somebody, solve problems with somebody, share solutions...

He gave to you, actually sold to you a product and lock-up your abilities. You were forced to buy his products, or steal it. Neither of these two solutions aren't good. In the first case, you have to pay a lot of money for almost everything (product, upgraded version of product, programs, upgraded version of program, you are forced to upgrade to newer version, pay for that too, because of that - buy new hardware and so on). In other case, you will get... let's say everything and nothing in the same time. You'll get desired program, but full of things that work something you have no idea. You will, at the end, spend your money or have software full of crap.

One thing is common in the situations. You don't get a source code.


Source code allows you to read a program, to see how it works, to know what it works in your computer. 

Make a change in your life, make your life and computer work easier. Choose freedom - choose Ubuntu.

Ubuntu is the most used operating system powered by Linux kernel. It's free as in beer and free as in speach. Ubuntu have about 50.000 packages you can install with one click. No cracks, no patches... Source code available.

Love games? Who don't. There is Steam client for Ubuntu Linux. Get it and play your favourite games. 
For those interesting in audio and video production - there is a bunch of things waiting to you.

Feel freedom, join to friendly communities and start new life, better life, honest life... Use your system - don't allow to system to use you.


http://www.ubuntu.com/download