Saturday, November 22, 2014

Wednesday, November 19, 2014

Change filesystem label in Ubuntu 14.04

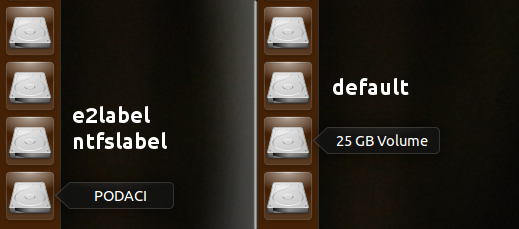
You probably noticed that drives in Ubuntu, by default, have their names by its size, not by operating system on it or by description of content. That's annoying me.

To change that, You need two packages: e2fsprogs and ntfs-3g.

First package contains e2label tool, for changing ext2, ext3 or ext4 filesystem label. And second contains ntfslabel tool for changing ntfs (Windows) filesystem label.

I think both e2fsprogs and ntfs-3g are installed by default in Ubuntu 14.04.

To change Your Linux or Windows filesystem label, do:

sudo e2label LINUX-DEVICE NEW-LABEL
or
sudo ntfslabel WIN-DEVICE NEW-LABEL

Replace LINUX-DEVICE and WIN-DEVICE with appropriate ones (i.e. /dev/sda2 or /dev/sda5). Replace NEW-LABELs with desired names, too.


See picture above for diffs.

For more options, see man pages of the tools.

Monday, November 17, 2014

Create aliases in Ubuntu 14.04

How often You must run some long commands in terminal? Even if You do not use "complicated" commands, You probably typed, at least once, the commands for updating Your system.

You know, like this:

sudo apt-get update && sudo apt-get upgrade

This and similar (long) commands can be very iritated, no matter if You use it often. Because of that, You can create aliases for frequently used commands. Alias is shorter command. In example, You can type update to update Your system instead of the above (long) command.

To do this, You need to enter alias for a command in appropriate file. That file is $HOME/.bashrc. It's hidden file, located in Your /home directory. To see it, press ctrl+h key combo. Open the file and scroll down to the bottom. Now, enter aliases for desired commands, like this:

alias update="sudo apt-get update && sudo apt-get upgrade"

See how it looks in my .bashrc file:


I created section My aliases and put there aliases for frequently used commands. You can call it whatever You want.

After You finish this, Save the file. Now, You need to do one more step. Open terminal and type:

source ~/.bashrc

After that, when You want to update Your system, all You need to type in terminal is update.

Saturday, November 15, 2014

Wednesday, November 12, 2014

HOW-TO: Automount partition(s) in Ubuntu

In this article I'll show You how to automatically mount a partition on system start up. In Ubuntu this is not something You must to do if You want to access Your "other system" or "data" partition because Ubuntu has simplified system for that purpose. In other Linux systems, like i.e. Slackware or Arch, this is very usefull because there You need to enter Your root password to access other partitions. But, there is no impediments to do this in Ubuntu, too.

The file we interested in is /etc/fstab.


Step 1


Get UUID of desired partition You want to automount. Simply call blkid as root in terminal: 

sudo blkid

This will list all Your partitions with their UUIDs.


Step 2


Create folder in which You will mount desired partition. I prefere /media/FOLDER location for mounting other partitions. Replace FOLDER with desired name.

sudo mkdir /media/FOLDER

Step 3


Open /etc/fstab in Your favourite text editor and see the picture before Step 1, in this article.
First, enter description for the partition. Do it in comment mode. Put # in front of descrition, so the line will be interpretedlike a comment, not code.
You may notice on the picture, the third line from bottom, some columns:

<file system>  <mount point>   <type>    <options>     <dump>      <pass>

This will help You to correctly enter all necessary informations in the file. Separate columns with TAB key.

<file system>

Partition or storage device to be mounted. Here You can add partition like i.e. /dev/sda2 or You can add UUID like on the picture.

<mount point>

Directory (mountpoint) where <file system> is mounted to. In our example - /media/FOLDER

<type>

The <file system> type, like ext3, ext4, ntfs, btrfs and so on.

<options>

Mount options of the filesystem to be used. See all mount options. Don't be afraid, in almost all cases it'll be defaults.

<dump>

Used by the dump utility to decide when to make a backup. If "0", dump will ignore the file system. If "1", dump will make a backup.

<pass>

Used by fsck to decide which order filesystems are to be chacked. Possible values are 0,1 and 2. Root filesystem should have the highest priority - 1. Other filesystems should have lower priority - 2. If "0", filesystem will not be checked by fsck.


Well, the line should have look like this:

UUID=your_uuid             /media/FOLDER             ext4             defaults            0             1

Save the file.

Step 4

Open terminal and mount all entered partitions.

sudo mount -a

Then, check if everything went good.

cd /media/FOLDER
dir

If You see appropriateitems, everything is OK.

From now on, everytime You start Your system, the partition(s) will be automatically mounted.

Monday, November 10, 2014

Remove items from sound indicator in Unity panel (troubleshooting) ::: Ubuntu 14.04

As You know, when some audio/video app is open, relevant item appears in sound indicator in Unity panel. Item(s) stays there forever. For me, it can be annoying. There is a way to remove it from sound indicator, but sometimes it is impossible to do it successfully. Why, I don't know.


Here I'm going to show You how to remove items from sound indicator in Unity panel. Regular way is to use dconf-editor. Simply, open the app and navigate to
com/canonical/indicator/sound.


When You start i.e. Rhythmbox music player, it appears in interested-media-players line. You need to reset this to default value, so sound indicator will be cleaned after system reboot. Further, if You want to prevent Rhythmbox from showing in sound indicator, simply put 'rhythmbox' value in blacklisted-media-players line above (first line).

What to do if this does not work? 


From some reason, this does not work for me. So I need to manually reset intersted-media-players parameter every time when logged in Ubuntu. I found another way to do this. I wrote a script for this task and put it in Startup Applications, so it runs automatically every time I logged in Ubuntu.

#! /bin/sh
#
# Reset interested-media-players parameter in
# dconf-editor

set -e

gsettings reset com.canonical.indicator.sound \
interested-media-players

exit 0

I called it reset_interested_media_players.sh. You can call it whatever You want. You need to make it executable.

sudo chmod +x SCRIPT

And You need to put it in Startup Applications, so it runs every time You log in Your system.


In Command space, enter the following:

sh -e /script/location/SCRIPT.sh

Change script location and SCRIPT.sh with appropriate values. That's it... It's not a big thing, but it does the job.

Saturday, November 8, 2014

Friday, November 7, 2014

Change mouse click behavior and add DELETE action in Nautilus context menu

Big majority of computer users used to open files and folders by double click on mouse. But, there is option to change mouse behavior, so You can open files and folders by single mouse click. There are many pros and cons about this behavior, all depends of a user and his/her habits, ways of computer using.

In example, it's good for faster opening files and folders, but it's not good for previewing files in Nautilus, because You must click on a file (select it), so You can preview it. This can slow all the operation, because You can not click on a file (this will open the file), but You need to select it.
I am going to show You how to change this behavior and You decide whether You'll change it or not.

Open Nautilus and head for Edit->Preferences and choose Behavior tab. In the first section, Behavior, You can change mouse click behavior, by choosing Single click to open items.


I was long-time KDE user and I loved very much this feature in KDE. But, Unity differs from KDE and here the option isn't that usefull like in KDE.

As You can see, in the same tab is other options. There is also option for adding DELETE action in Nautilus context menu. Look for it in Trash section, at the end of the tab. Just mark the box before Include a Delete command that bypasses Trash.

This is very usefull (for me), because I don't like moving files to Trash and then click to Empty Trash. Boring to me... By including the command in Nautilus context menu, You will be able to bypass Trash. My advide to You is not to uncheck previous option, Ask before emptying the Trash or deleting files. It's a good safety measure.

Thursday, November 6, 2014

Show real name in Unity panel

I can not remember whether there was real name shown in Unity panel by default, in earlier versions of Ubuntu's Unity. Nevermind, in this article I am going to show You how to do it. I prefer not to show my name in Unity panel, but who cares about me...

OK, there are more then one way to do this, but I'll do it in two different ways.

dconf-editor

Open dconf-editor and navigate to apps/indicator-session and check the box behind show-real-name-on-panel.


Unity Tweak Tool

Launch Unity Tweak Tool and search for Panel section. There You can check the box before Show my name.


Now You can see Your (real) name in the far right on panel.


Wednesday, November 5, 2014

How to change scrollbar mode in Ubuntu 14.04 (Unity)

If You are new, fresh Ubuntu user, You probably noticed that scollbars are in overlay mode. You must place cursor over tiny field on the right side of window, so scrollbar appears. If You don't like overlay mode, You can change it to normal (legacy) mode just in a few clicks.

dconf-editor

Navigate to com/canonical/desktop/interface


You can choose normal, overlay auto, overlay pointer and overlay touch mode.


Unity-Tweak-Tool

Open Unity Tweak Tool and go to Scrolling section.


Here You can change overlay mode to legacy (normal).


Monday, November 3, 2014

How to disable Suspending and Screen Locking in Ubuntu 14.04

How many times Your screen was locked or suspended while You were watching Youtube videos or movies, listening music... Is that annoying You? Me, too.

Well, it is good feature (enabled by default in Ubuntu 14.04) when You are using laptop, but on desktop computers it can be very irritating. Most of all, because on desktop computers there is no need for power or battery saving. Same situation is in case of laptop plugged in AC/DC power.

Here I'm going to show You how to disable these features, and You'll can enable them later, if You'll need them.

Everything You need to do is to open System Settings and navigate, first to Brightness & Lock. Change settings like ones on the picture:


Then, go back to Power section and do the same:


And that's it. You can now peacefully watch videos or listen music. Enjoy...

Saturday, November 1, 2014

Weekly reminder ::: Week 3

Almost a month has gone and the blog is growing slowly. 
In this week, we had some tips and tricks related to Ubuntu 14.04 and Unity DE.


I want to thank you all for visiting and reading my blog.
I love you and see you next week.

Stay free...